CountDownLatch
Example:
1
2
3
4
5
6
7
8
9
10
11
12
13
14
15
16
17
18
19
20
21
22
23
24
25
26
27
28
29
30
31
32
33
34
class Driver2 { // ...
    void main() throws InterruptedException {
        CountDownLatch doneSignal = new CountDownLatch(N);
        Executor e = Executors.newFixedThreadPool(8);

        // 创建 N 个任务,提交给线程池来执行
        for (int i = 0; i < N; ++i) // create and start threads
            e.execute(new WorkerRunnable(doneSignal, i));

        // 等待所有的任务完成,这个方法才会返回
        doneSignal.await();           // wait for all to finish
    }
}

class WorkerRunnable implements Runnable {
    private final CountDownLatch doneSignal;
    private final int i;

    WorkerRunnable(CountDownLatch doneSignal, int i) {
        this.doneSignal = doneSignal;
        this.i = i;
    }

    public void run() {
        try {
            doWork(i);
            // 这个线程的任务完成了,调用 countDown 方法
            doneSignal.countDown();
        } catch (InterruptedException ex) {
        } // return;
    }

    void doWork() { ...}
}
example2:
1
2
3
4
5
6
7
8
9
10
11
12
13
14
15
16
17
18
19
20
21
22
23
24
25
26
27
28
29
30
31
32
33
34
35
36
37
38
39
40
class Driver { // ...
    void main() throws InterruptedException {
        CountDownLatch startSignal = new CountDownLatch(1);
        CountDownLatch doneSignal = new CountDownLatch(N);

        for (int i = 0; i < N; ++i) // create and start threads
            new Thread(new Worker(startSignal, doneSignal)).start();

        // 这边插入一些代码,确保上面的每个线程先启动起来,才执行下面的代码。
        doSomethingElse();            // don't let run yet
        // 因为这里 N == 1,所以,只要调用一次,那么所有的 await 方法都可以通过
        startSignal.countDown();      // let all threads proceed
        doSomethingElse();
        // 等待所有任务结束
        doneSignal.await();           // wait for all to finish
    }
}

class Worker implements Runnable {
    private final CountDownLatch startSignal;
    private final CountDownLatch doneSignal;

    Worker(CountDownLatch startSignal, CountDownLatch doneSignal) {
        this.startSignal = startSignal;
        this.doneSignal = doneSignal;
    }

    public void run() {
        try {
            // 为了让所有线程同时开始任务,我们让所有线程先阻塞在这里
            // 等大家都准备好了,再打开这个门栓
            startSignal.await();
            doWork();
            doneSignal.countDown();
        } catch (InterruptedException ex) {
        } // return;
    }

    void doWork() { ...}
}
这个例子中,doneSignal 同第一个例子的使用,我们说说这里的 startSignal。N 个新开启的线程都调用了startSignal.await() 进行阻塞等待,它们阻塞在栅栏上,只有当条件满足的时候(startSignal.countDown()),它们才能同时通过这个栅栏,目的是让所有的线程站在一个起跑线上。
 如果始终只有一个线程调用 await 方法等待任务完成,那么 CountDownLatch 就会简单很多,所以之后的源码分析读者一定要在脑海中构建出这么一个场景:有 m 个线程是做任务的,有 n 个线程在某个栅栏上等待这 m 个线程做完任务,直到所有 m 个任务完成后,n 个线程同时通过栅栏。
源码分析
构造方法
1
2
3
4
5
6
7
8
9
10
11
12
public CountDownLatch(int count) {
    if (count < 0) throw new IllegalArgumentException("count < 0");
    this.sync = new Sync(count);
}
// 老套路了,内部封装一个 Sync 类继承自 AQS
private static final class Sync extends AbstractQueuedSynchronizer {
    Sync(int count) {
        // 这样就 state == count 了
        setState(count);
    }
    ...
}
AQS 里面的 state 是一个整数值,这边用一个 int count 参数其实初始化就是设置了这个值,所有调用了 await 方法的等待线程会挂起,然后有其他一些线程会做 state = state - 1 操作,当 state 减到 0 的同时,那个将 state 减为 0 的线程会负责唤醒 所有调用了 await 方法的线程。
对于 CountDownLatch,我们仅仅需要关心两个方法,一个是 countDown() 方法,另一个是 await() 方法。
countDown() 方法每次调用都会将 state 减 1,直到 state 的值为 0;而 await 是一个阻塞方法,当 state 减为 0 的时候,await 方法才会返回。await 可以被多个线程调用,读者这个时候脑子里要有个图:所有调用了 await 方法的线程阻塞在 AQS 的阻塞队列中,等待条件满足(state == 0),将线程从队列中一个个唤醒过来。
1
2
3
4
5
6
7
8
9
10
11
12
13
14
15
16
17
18
19
20
21
22
23
24
25
26
27
28
29
30
31
32
33
34
35
36
37
38
39
40
41
42
43
44
45
46
47
48
49
50
51
52
53
54
55
56
57
58
59
60
61
62
63
64
public class CountDownLatchDemo {

    public static void main(String[] args) {

        CountDownLatch latch = new CountDownLatch(2);

        Thread t1 = new Thread(new Runnable() {
            @Override
            public void run() {
                try {
                    Thread.sleep(5000);
                } catch (InterruptedException ignore) {
                }
                // 休息 5 秒后(模拟线程工作了 5 秒),调用 countDown()
                latch.countDown();
            }
        }, "t1");

        Thread t2 = new Thread(new Runnable() {
            @Override
            public void run() {
                try {
                    Thread.sleep(10000);
                } catch (InterruptedException ignore) {
                }
                // 休息 10 秒后(模拟线程工作了 10 秒),调用 countDown()
                latch.countDown();
            }
        }, "t2");

        t1.start();
        t2.start();

        Thread t3 = new Thread(new Runnable() {
            @Override
            public void run() {
                try {
                    // 阻塞,等待 state 减为 0
                    latch.await();
                    System.out.println("线程 t3 从 await 中返回了");
                } catch (InterruptedException e) {
                    System.out.println("线程 t3 await 被中断");
                    Thread.currentThread().interrupt();
                }
            }
        }, "t3");
        Thread t4 = new Thread(new Runnable() {
            @Override
            public void run() {
                try {
                    // 阻塞,等待 state 减为 0
                    latch.await();
                    System.out.println("线程 t4 从 await 中返回了");
                } catch (InterruptedException e) {
                    System.out.println("线程 t4 await 被中断");
                    Thread.currentThread().interrupt();
                }
            }
        }, "t4");

        t3.start();
        t4.start();
    }
}
await() 方法,它代表线程阻塞,等待 state 的值减为 0
1
2
3
4
5
6
7
8
9
10
11
12
13
14
15
16
17
18
public void await() throws InterruptedException {
    sync.acquireSharedInterruptibly(1);
}
public final void acquireSharedInterruptibly(int arg)
        throws InterruptedException {
    // 这也是老套路了,我在第二篇的中断那一节说过了
    if (Thread.interrupted())
        throw new InterruptedException();

    // t3 和 t4 调用 await 的时候,state 都大于 0(state 此时为 2)。
    // 也就是说,这个 if 返回 true,然后往里看
    if (tryAcquireShared(arg) < 0)
        doAcquireSharedInterruptibly(arg);
}
// 只有当 state == 0 的时候,这个方法才会返回 1
protected int tryAcquireShared(int acquires) {
    return (getState() == 0) ? 1 : -1;
}
从方法名我们就可以看出,这个方法是获取共享锁,并且此方法是可中断的(中断的时候抛出 InterruptedException 退出这个方法)。
1
2
3
4
5
6
7
8
9
10
11
12
13
14
15
16
17
18
19
20
21
22
23
24
25
26
27
28
29
private void doAcquireSharedInterruptibly(int arg)
    throws InterruptedException {
    // 1. 入队
    final Node node = addWaiter(Node.SHARED);
    boolean failed = true;
    try {
        for (;;) {
            final Node p = node.predecessor();
            if (p == head) {
                // 同上,只要 state 不等于 0,那么这个方法返回 -1
                int r = tryAcquireShared(arg);
                if (r >= 0) {
                    setHeadAndPropagate(node, r);
                    p.next = null; // help GC
                    failed = false;
                    return;
                }
            }
            // 2
            if (shouldParkAfterFailedAcquire(p, node) &&
                parkAndCheckInterrupt())
                throw new InterruptedException();
        }
    } finally {
        if (failed)
            cancelAcquire(node);
    }
}
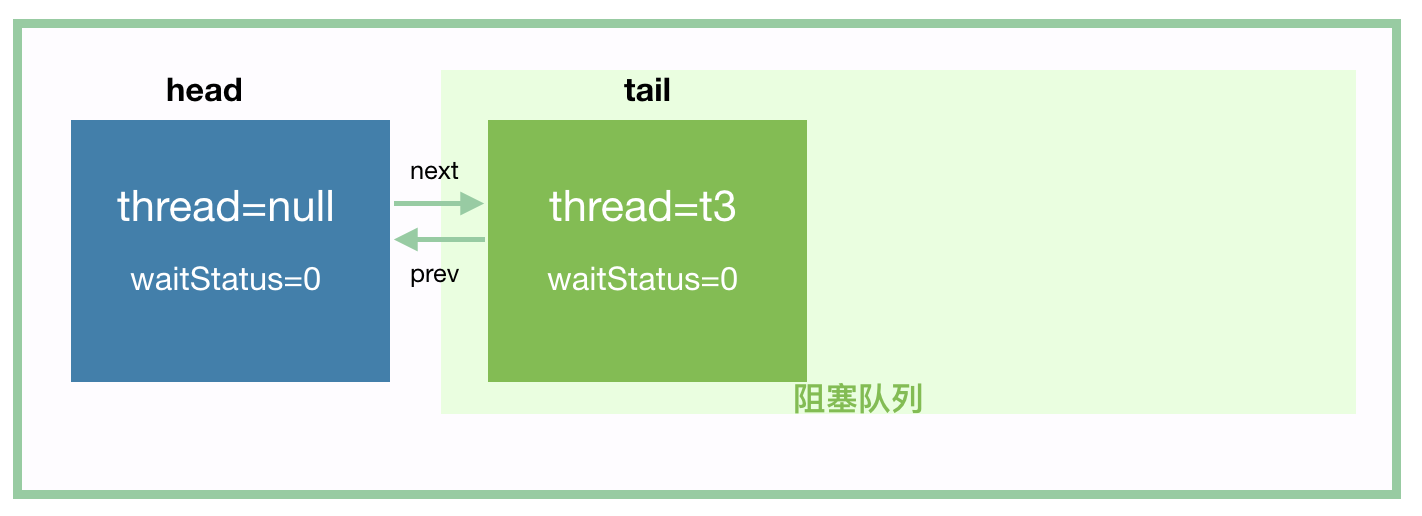
我们来仔细分析这个方法,线程 t3 经过第 1 步 addWaiter 入队以后,我们应该可以得到这个:
 由于 tryAcquireShared 这个方法会返回 -1,所以 if (r >= 0) 这个分支不会进去。到 shouldParkAfterFailedAcquire 的时候,t3 将 head 的 waitStatus 值设置为 -1,如下:
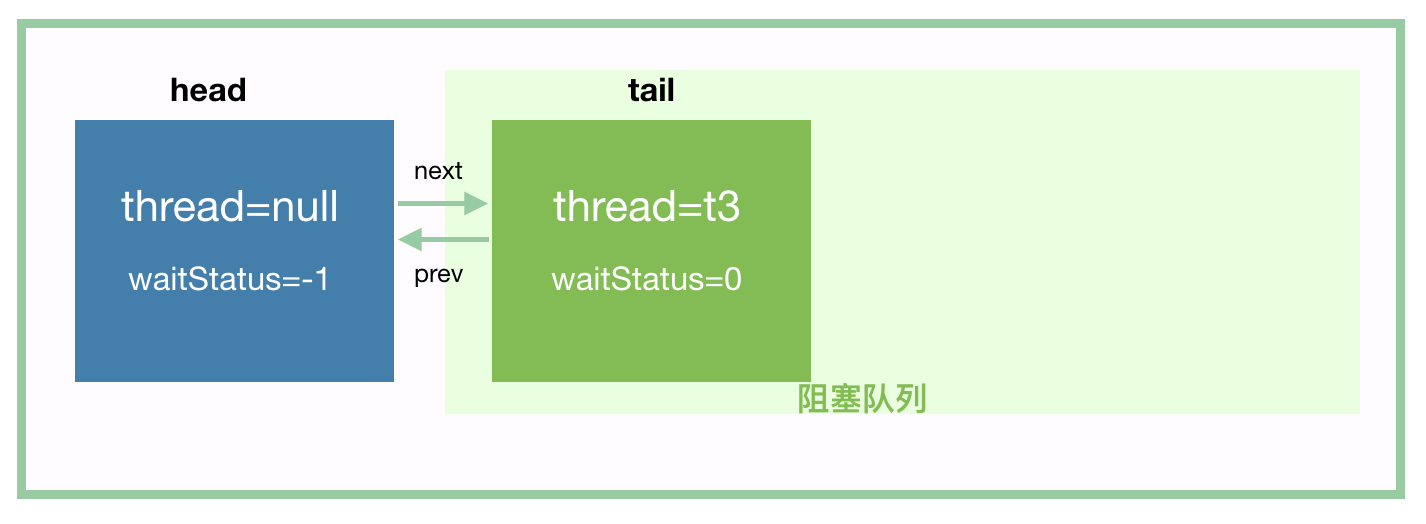 然后进入到 parkAndCheckInterrupt 的时候,t3 挂起。
我们再分析 t4 入队,t4 会将前驱节点 t3 所在节点的 waitStatus 设置为 -1,t4 入队后,应该是这样的:
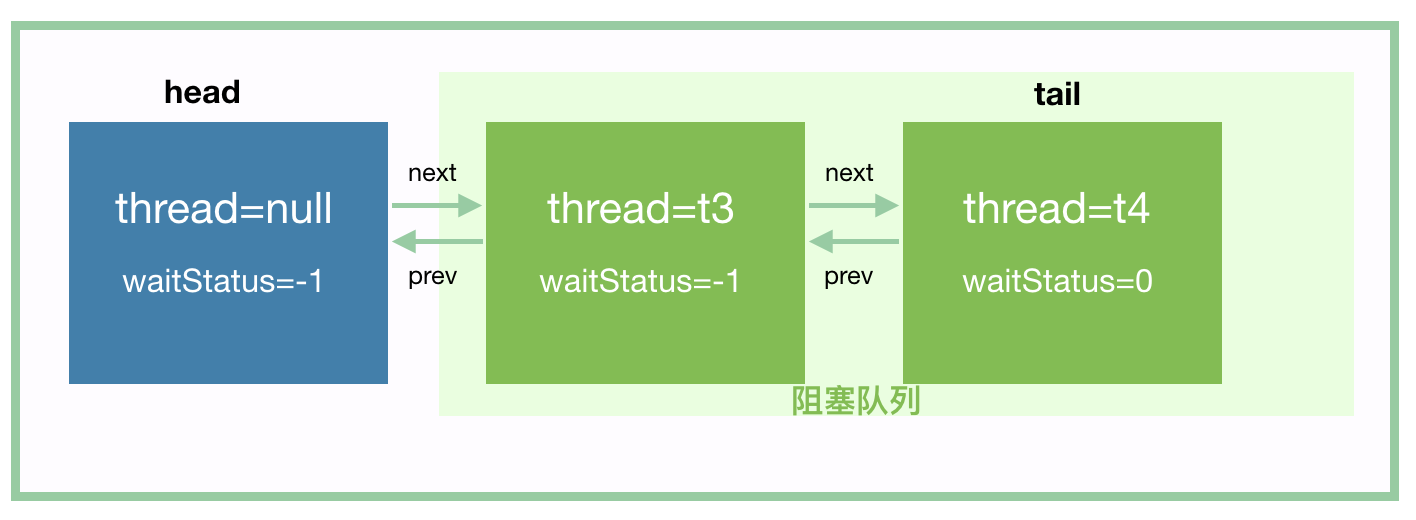 然后,t4 也挂起。接下来,t3 和 t4 就等待唤醒了。
接下来,我们来看唤醒的流程。为了让下面的示意图更丰富些,我们假设用 10 初始化 CountDownLatch。

#### countDown() 方法
1
2
3
4
5
6
7
8
9
10
11
12
13
14
15
16
17
18
19
20
21
22
23
24
25
public void countDown() {
    sync.releaseShared(1);
}
public final boolean releaseShared(int arg) {
    // 只有当 state 减为 0 的时候,tryReleaseShared 才返回 true
    // 否则只是简单的 state = state - 1 那么 countDown() 方法就结束了
    //    将 state 减到 0 的那个操作才是最复杂的,继续往下吧
    if (tryReleaseShared(arg)) {
        // 唤醒 await 的线程
        doReleaseShared();
        return true;
    }
    return false;
}
// 这个方法很简单,用自旋的方法实现 state 减 1
protected boolean tryReleaseShared(int releases) {
    for (;;) {
        int c = getState();
        if (c == 0)
            return false;
        int nextc = c-1;
        if (compareAndSetState(c, nextc))
            return nextc == 0;
    }
}
countDown 方法就是每次调用都将 state 值减 1,如果 state 减到 0 了,那么就调用下面的方法进行唤醒阻塞队列中的线程:
1
2
3
4
5
6
7
8
9
10
11
12
13
14
15
16
17
18
19
20
21
22
23
24
25
// 调用这个方法的时候,state == 0
// 这个方法先不要看所有的代码,按照思路往下到我写注释的地方,我们先跑通一个流程,其他的之后还会仔细分析
private void doReleaseShared() {
    for (;;) {
        Node h = head;
        if (h != null && h != tail) {
            int ws = h.waitStatus;
            // t3 入队的时候,已经将头节点的 waitStatus 设置为 Node.SIGNAL(-1) 了
            if (ws == Node.SIGNAL) {
                // 将 head 的 waitStatue 设置为 0
                if (!compareAndSetWaitStatus(h, Node.SIGNAL, 0))
                    continue;            // loop to recheck cases
                // 就是这里,唤醒 head 的后继节点,也就是阻塞队列中的第一个节点
                // 在这里,也就是唤醒 t3
                unparkSuccessor(h);
            }
            else if (ws == 0 &&
                     !compareAndSetWaitStatus(h, 0, Node.PROPAGATE)) // todo
                continue;                // loop on failed CAS
        }
        if (h == head)                   // loop if head changed
            break;
    }
}
一旦 t3 被唤醒后,我们继续回到 await 的这段代码,parkAndCheckInterrupt 返回,我们先不考虑中断的情况:
1
2
3
4
5
6
7
8
9
10
11
12
13
14
15
16
17
18
19
20
21
22
23
24
25
26
27
private void doAcquireSharedInterruptibly(int arg)
    throws InterruptedException {
    final Node node = addWaiter(Node.SHARED);
    boolean failed = true;
    try {
        for (;;) {
            final Node p = node.predecessor();
            if (p == head) {
                int r = tryAcquireShared(arg);
                if (r >= 0) {
                    setHeadAndPropagate(node, r); // 2. 这里是下一步
                    p.next = null; // help GC
                    failed = false;
                    return;
                }
            }
            if (shouldParkAfterFailedAcquire(p, node) &&
                // 1. 唤醒后这个方法返回
                parkAndCheckInterrupt())
                throw new InterruptedException();
        }
    } finally {
        if (failed)
            cancelAcquire(node);
    }
}
接下来,t3 会进到 setHeadAndPropagate(node, r) 这个方法,先把 head 给占了,然后唤醒队列中其他的线程:
1
2
3
4
5
6
7
8
9
10
11
12
13
14
private void setHeadAndPropagate(Node node, int propagate) {
    Node h = head; // Record old head for check below
    setHead(node);

    // 下面说的是,唤醒当前 node 之后的节点,即 t3 已经醒了,马上唤醒 t4
    // 类似的,如果 t4 后面还有 t5,那么 t4 醒了以后,马上将 t5 给唤醒了
    if (propagate > 0 || h == null || h.waitStatus < 0 ||
        (h = head) == null || h.waitStatus < 0) {
        Node s = node.next;
        if (s == null || s.isShared())
            // 又是这个方法,只是现在的 head 已经不是原来的空节点了,是 t3 的节点了
            doReleaseShared();
    }
}
又回到这个方法了,那么接下来,我们好好分析 doReleaseShared 这个方法,我们根据流程,头节点 head 此时是 t3 节点了:
1
2
3
4
5
6
7
8
9
10
11
12
13
14
15
16
17
18
19
20
21
22
23
24
25
26
27
28
29
30
31
32
// 调用这个方法的时候,state == 0
private void doReleaseShared() {
    for (;;) {
        Node h = head;
        // 1. h == null: 说明阻塞队列为空
        // 2. h == tail: 说明头结点可能是刚刚初始化的头节点,
        //   或者是普通线程节点,但是此节点既然是头节点了,那么代表已经被唤醒了,阻塞队列没有其他节点了
        // 所以这两种情况不需要进行唤醒后继节点
        if (h != null && h != tail) {
            int ws = h.waitStatus;
            // t4 将头节点(此时是 t3)的 waitStatus 设置为 Node.SIGNAL(-1) 了
            if (ws == Node.SIGNAL) {
                // 这里 CAS 失败的场景请看下面的解读
                if (!compareAndSetWaitStatus(h, Node.SIGNAL, 0))
                    continue;            // loop to recheck cases
                // 就是这里,唤醒 head 的后继节点,也就是阻塞队列中的第一个节点
                // 在这里,也就是唤醒 t4
                unparkSuccessor(h);
            }
            else if (ws == 0 &&
                     // 这个 CAS 失败的场景是:执行到这里的时候,刚好有一个节点入队,入队会将这个 ws 设置为 -1
                     !compareAndSetWaitStatus(h, 0, Node.PROPAGATE))
                continue;                // loop on failed CAS
        }
        // 如果到这里的时候,前面唤醒的线程已经占领了 head,那么再循环
        // 否则,就是 head 没变,那么退出循环,
        // 退出循环是不是意味着阻塞队列中的其他节点就不唤醒了?当然不是,唤醒的线程之后还是会调用这个方法的
        if (h == head)                   // loop if head changed
            break;
    }
}
我们分析下最后一个 if 语句,然后才能解释第一个 CAS 为什么可能会失败:
- h == head:说明头节点还没有被刚刚用 unparkSuccessor 唤醒的线程(这里可以理解为 t4)占有,此时 break 退出循环。
- h != head:头节点被刚刚唤醒的线程(这里可以理解为 t4)占有,那么这里重新进入下一轮循环,唤醒下一个节点(这里是 t4 )。我们知道,等到 t4 被唤醒后,其实是会主动唤醒 t5、t6、t7…,那为什么这里要进行下一个循环来唤醒 t5 呢?我觉得是出于吞吐量的考虑。 满足上面的 2 的场景,那么我们就能知道为什么上面的 CAS 操作 compareAndSetWaitStatus(h, Node.SIGNAL, 0) 会失败了?
因为当前进行 for 循环的线程到这里的时候,可能刚刚唤醒的线程 t4 也刚刚好到这里了,那么就有可能 CAS 失败了。
for 循环第一轮的时候会唤醒 t4,t4 醒后会将自己设置为头节点,如果在 t4 设置头节点后,for 循环才跑到 if (h == head),那么此时会返回 false,for 循环会进入下一轮。t4 唤醒后也会进入到这个方法里面,那么 for 循环第二轮和 t4 就有可能在这个 CAS 相遇,那么就只会有一个成功了。